Long time, no OOTD.

Fellow fashion lovers, I am sorry that I haven’t been posting in awhile. If you don’t know, I have been focusing my attention on my other blog called She Conquers the Chaos. It’s a women’s blog whose goal is to influence followers of Christ to conquer the chaos of living in a secular world. I created the blog because I was not completely satisfied with this blog. Yes, I love fashion, DIY projects, Pinterest, and beauty tutorials, but that is not the point of life. It’s also not what I am most passionate about. I hope that you make your way over to the site. Feel free to share your honest opinions. But don’t worry, I won’t be going anywhere. I still plan on posting on this lifestyle blog too.

Processed with VSCOcam with b5 preset

A few weeks ago, my college had a sophomore class Sadie Hawkins Social, and I am quite obsessed with the dress I found for it. It took some searching to find the kind of dress I was looking for, but I found it at Francesca’s Boutique in Polaris. The workers were very helpful and picked out the dress for me to try on. They told me the dress just came in that week, and when I saw it, I instantly loved it. Even though I wish it was two to three inches longer, I was comfortable wearing it because I still felt modest in it. It costs about $55 (…I splurged because it was too good not to pass up). Just FYI, Francesca’s Boutique does student discounts. It’s 10% off when you show your student ID. Unfortunately, I did not find this out until after I bought the dress. I found the teal earrings at Charming Charlies for $6. That store never seems to disappoint.

 Processed with VSCOcam with f2 preset Processed with VSCOcam with f2 preset

Don’t my lovely apartment mates look gorgeous! (And no, we did not plan wearing all black. It just kind of happened.)

Photo Mar 03, 10 59 29 AM

And of course, I have to share only the greatest selfie ever recorded. I am so blessed by this group of friends. The transition from SAU to MVNU was beyond easy with how welcoming these friends were from day one. I couldn’t have asked for better apartment mates or friends.

Photo Mar 02, 5 25 40 PM

Outfit of the Day

Here’s a quick outfit of the day post for your enjoyment.

Processed with VSCOcam with f2 preset

Headband: American Eagle – $3

Shoes: Madewell flats found at Plato’s Closet – $30

Jeans: American Eagle high wasted dark wash – $30

Black Shirt: New York and Company Outlet in Jeffersonville – $11

Jacket: found at Plato’s Closet for – $12

Shoulder bag: Fossil found at the outlet in Jeffersonville – $80

Mug: from the Starbucks store (Christmas present)

Nothing completes an outfit more than lipstick. Today, I am wearing Lorac Lip Luxe in the color Bordeaux.

I’m absolutely loving my new hair color. If you are looking for a new hairstylist, I highly recommend Holly H. at Trends in Washington Court House, Ohio. She’s adorable and really fun to chat with! To make an appointment, call (740) 333-4247.

10917062_10205414059691600_7044033989251861751_n

Pottery Barn Walk-In Closet: How To

Recently, my parents informed me that they finally agreed to give me the basement. Not only do I have my own shower now, but I have my own walk-in closet! It’s definitely a work-in-progess, but the first dilemma I faced was finding a place to hang my clothes because there isn’t a closet in the small bedroom downstairs. At first, we decided to try actually clothes racks. I assembled them, and they were just way to flimsy for my liking, so I did what I do best and pinterested ideas.

img25c

I fell in LOVE with Pottery Barn’s closet shelves…until I realized that it costs $200 per 4′ shelf. No thank you! But I did not stop there. I did my research and decided that I could create my own closet shelves for a lot cheaper. Never underestimate a Pinterest fanatic on a mission.

Here’s my finished project!
Processed with VSCOcam with f2 preset

Here’s how I accomplished the closet shelving featured above. I went to Lowe’s and found all the supplies needed. The following is a list of everything you will need:
– A Closet Shelf
Shelf and Rod Brackets
– Screws
– Screwdriver
– Power drill
– Pencil
Altogether, I spent $60 on supplies.

Processed with VSCOcam with f2 preset

First Step:
Attach the brackets to the closet shelves, spacing them about 10-20 inches apart.
Processed with VSCOcam with f2 preset

Second Step:
Hold the shelf in the place where you want it. Make sure the shelf is level. Make dots in the top holes where the screw will go with a pencil. You will most likely need help with this step.

Third Step:
Drill holes where the top screws will go in the wall.
Processed with VSCOcam with f2 preset

Step Four:
Go ahead and screw the screws in, but not all of the way. Just to the end of the ridges.

Step Five:
Place shelf on the wall and finish screwing the top screws in.

Step Six:
Drill holes in the bottom screw holes and screw those screws into place.

Step Seven:
Go ahead and place the closet rod on the closet rack.
Processed with VSCOcam with f2 preset

And there you have it. It’s as simple as it sounds. If I can do, you can do it too.
Processed with VSCOcam with f2 preset

Be sure to let me know how your closet shelves turn out. Happy crafting!

My Homemade Soft Pretzels.

I (maybe) have a slight obsession with pretzels… and when I started to crave Auntie Anne’s pretzels on Sunday, I went straight to Pinterest to find a copy-cat recipe. To my delight, I had all of the ingredients that I needed at home and immediately starting baking. Not only did my pretzels turn out perfectly, but they also tasted better than Auntie Anne’s. (Look out for my new pretzels shop. Coming soon to a mall near you.) Here’s my version of the recipe that I followed (inspired by cookingclassy.com)

Soft Pretzels.

WHAT YOU’LL NEED:

2 cups of milk

2 packets of dry yeast

6 Tbsp of packed brown sugar

4 Tbsp of butter at room temperature

4 ½ cups of floor

2 Tsp of fine salt

⅓ cups of baking soda

3 cups of warm water

Coarse salt

6-9 Tbsp of butter (melted)


Directions:

Step one: Microwave milk in a microwave safe bowl for 2 minutes on high.

Step two: Pour yeast into milk, and whisk together with an electric mixer. Let rest for 5 minutes.

Step three: Add 6 Tbsp brown sugar, 4 Tbsp of butter, 1 cup of floor, and 2 Tbsp of fine sea salt to the milk. Mix until blended.

Step four: Switch to dough hook, and add remaining floor. Mix until dough pulls away from the bowl.

Step five: Cover bowl with plastic wrap. Let dough rise in a warm place for 1 hour.

Step six: Preheat oven to 450 degrees. Line two baking trays with parchment paper.

Step seven: Punch dough several times to release air bubbles. (Putting floor on your hands helps the dough not to stick.)

Step eight: Divide dough into 12 equal pieces (separate into fourths and then thirds).

Step nine: Cover dough with plastic wrap to prevent crustiness.

Step ten: Roll each piece into thin ropes about 32-36″ long.

Step eleven: In a shallow bowl, mix together warm water and baking soda.

Step twelve: Place rope into mixture until fully covered. Take out and allow water to drip off.

Step thirteen: Place onto the tray and shape into a pretzel shape. Fit about 4 pretzels per sheet.

Step fourteen: Salt the pretzels with the coarse salt.

Step fifteen: Bake for 6-9 minutes or until golden brown.

Step sixteen: Brush top and bottom of pretzels with melted butter.

Step seventeen: Enjoy!!

Ps. I like dipping the warm pretzels in melted butter… Perfection ❤

Processed with VSCOcam with f2 preset

Happy salty-pretzel craving and baking!

Disgusting Beauty.

Being a woman who wants to go into ministry, I feel like I need to clarify to my readers of my intentions when it comes to my blog. Yes, I love fashion, Pinterest, and trying new products and ideas, but I want to make one thing clear. Beauty is not everything, and it is definitely not the defining part of who I am. And it shouldn’t be your defining factor either. You are much more than your appearance.

I may not be perfect (and you probably aren’t either), but I know that I am beautiful and worthy of love in God’s eyes.

And yet, I still catch myself being engulfed by the idea that my imperfections are what define me. This post has sat in my Draft Box for months now because, sometimes, I don’t even know how to confront my own insecurities of self worth. Dealing with the world’s standards for women is an issue I feel like almost every woman in America is facing. The world teaches us to compare ourselves to celebrities and our peers, and yet, comparison is one of the most hurtful things we can do to ourselves. Learning that comparison really is a thief of joy is one of the hardest concepts I think I have had to learn as a woman, and I still am stumped by what others think of me sometimes. Why is that? Why do I feel the need to always be improving my appearance above all else?

The truth is the definition of beauty is one of the most corrupt inventions of the world today.

Take a look at what the media is portraying as beauty right now. What do you see? I see SO many photoshopped women who have been made to have unrealistic proportions. Unrealistic facial features. Unrealistic body structure. Unrealistic curves. Unrealistic beauty.

Don’t think it is that bad? Check out this video. It’s quite shocking.

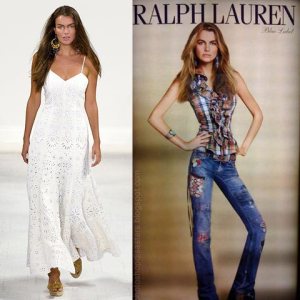
Yet, this is how women of today are expected to look like when, in reality, no one can look like what the media is portraying. Not even today’s models are able to achieve this ideal beauty. Just look at how Ralph Lauren edited Filippa Hamilton for their magazine cover. The photo on the left is said to be unedited, while the right is obviously Photoshopped. Take a look at her waste size compared to her head. (Filippa Hamilton claimed that she did not approve of how she was portrayed on the cover, and was later fired because they considered her “too fat.”) And this is only one example of how messed up the media’s mind is.

Filippa Hamilton

And how about celebrities? I bet if you Googled “Celebrity Women Who Have Had Plastic Surgery,” you would be shocked by how many breast implants and facial reconstructions that have been done. And yet, we feel like we have to look like them. We feel like spending thousands of dollars to be reconstructed is acceptable and desired. Why is this okay? Why do we feel like we have to become as idealized as possible?

We know the counterfeit imitations of the world’s beauty, so why do we still seem to chase after this look? Why do we keep supporting the 32 million dollar cosmetic industry when we know how flawed it is? Why do we keep purchasing the newest hair products, the latest and best mascara, the coolest nail polish, or the trendiest accessories – when we know these things, in the end, will not satisfy us?

Is it because of peer pressure?  The need to feel beautiful? Accepted? Successful? Desired?

I am not saying that wanting to feel any of these traits is a bad thing. I am not even saying that women need to care less about their appearance. I am saying that this desire becomes wrong when we prioritize beauty. It is crazy to think about the amount of time and effort we, as women, put into our appearance, whether that means our clothes, cosmetics or weight.

So how do we overcome this idea of the world’s ideal appearance? Well, here are some of my tips.

1. Evaluating the Media. I’m not going to say to fast from all sources of media, because in this 21st day culture, that would be close to impossible. But I want to challenge you to take a closer look at what you are exposed to. Is your Pinterest feeding you impossible expectations? Are the TV shows you are watching making you feel like your closet isn’t big enough? Are you constantly checking for the newest beauty tutorials on Youtube? Or feeling discouraged by the Seventeen or Glamour magazines? Instead of feeding your insecurities, try to evaluate what is making you feel insecure. Once you figure it out, first of all, give it to God. Secondly, remind yourself that how the media portrays beauty is kind of (VERY) disgusting and unrealistic. The media is just a way for Satan to spit out lies of insecurity to you. And thirdly, tell yourself every time you think of your insecurity that it is a lie and remind yourself that you are beautiful (because you are!). You are beautiful, not only because of the way God created you physically but also, personally.

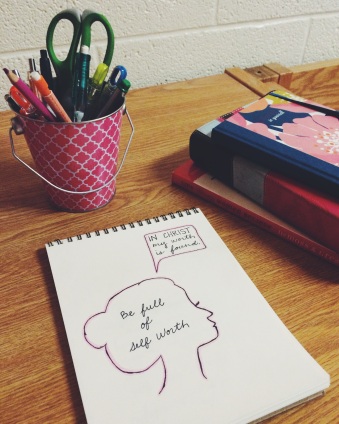
2. Have Self Worth. When I think of self worth, I think of confidence that won’t be shaken. This kind of confidence does not come from other people, but rather, from yourself.

Accept that God created you beautiful and for a purpose.

Accept that beauty isn’t everything.

Accept that looking perfect everyday will not happen … Sorry.

Accept that your beauty is just as gorgeous as your neighbor’s beauty.

Being able to be yourself confidently – even with all natural hair, no makeup, and sweatpants.

The truth is that you are going to have good days and bad days, but your appearance should not disrupt your chance on having a great day.

3. Devotional Time. This is the most important part. Even on my worst days, my personal time with God makes me feel refreshed and rejuvenated. If I start to feel insecure about myself, it is usually because I have been skipping my quiet time with Him. Not only will spending time with Him build your relationship, but it will also put your mind where it needs to be. And don’t forget… He created you. With Purpose. And beautifully.


Charm is deceptive,

and beauty is fleeting,

but a woman who fears

the Lord is to be praised.

Proverbs 31:30

Self Worth.

Last but not least, I would like to end with a hope filled video. Even though the world seems to be filled with glamorized, worldly women, there are still women out there who would like to see a change. I want to thank Colbie Caillat for posting her new music video, “Try,” as an empowering message to women about natural beauty. Check it out and let me know what you think. Also, a special shout out to the Dove company for sharing truths about Photo-Shop and self-worth and to So Worth Loving for encouraging all women that they are worthy of love. Don’t be afraid to let me know what your views are in the comment bar or if you have any other resources that goes along with the topic of how the media portrays women.

Thanks for listening, and don’t forget to encourage the women who are around you. They are going through the same storms as you are.

DIY: Book Page Wallpaper

With everything vintage coming back into style, I thought I would give my room a makeover this summer, but choosing what I wanted to do was the hardest part. I have had the same light purple walls since back in middle school, so needless to say, I wanted a change. I started my room makeover plans by (of course) searching Pinterest for cute ideas, but I kept coming back to vintage designed rooms.

While visiting my favorite antique shop in Pickerington last summer, I discovered the cutest room design and fell in love. The walls were covered in book pages, and all the rustic colored furniture pulled everything together.

IMG_6633

After much contemplating, I finally gave in, bought supplies, and went to work. All of my friends were impressed when they discovered I had changed up my room by adding a simple touch to one wall and what a difference it made. The book page wallpaper was so much easier than I thought it would be, and it turned out to look even better than I expected.

Photo Jun 28, 9 30 30 PM

Here’s what I did to achieve this vintage book page wallpaper:

Oh and by the way, the total cost turned out to be less than $5!!

1)  Step number one, I gathered the supplies I needed. I bought three small books and one bigger print book from Salvation Army during a sidewalk sale for only $1. I made sure all of the pages had a different tint to them. (Make sure to pick one old book that is especially tanned to give a nice contrast.) Don’t be afraid to check out your parents’, grandparents’, and great-grandparents’ book collections to see if they have anything you could use. If needed, you could leave the books outside to weather on their own in the rain. Keep in mind that I only did one wall. If you would like to do more than one wall, I would recommend buying more books. You will also need a spray adhesive. I bought the cheapest, clear adhesive spray I could find at Hobby Lobby ($5.99 + 40% off coupon = $3.60).

Processed with VSCOcam with f2 preset

2) Second, I tore out all of the pages from the books. I tried to make the edges as straight as I could, but the torn pages gave a nice layering look so do not worry if the pages do not tear out perfectly. I laid out the pages in four piles (one for each book) so that I could easily choose what page I wanted when it came time to start making my wallpaper.


3) I pushed everything away from the wall, turned on the movie Frozen (not required, but highly recommended), and grabbed a step stool (I am only 5’2″ so there is no way I can reach anywhere close to the ceiling).


4) What I should have done for the fourth step is put on a pair of gloves. The spray was hard to get off my hands and fingers. Especially my finger nails! So much for my nice manicure…


5) Fifth, I started from the top corner of the wall. I grabbed a page, sprayed one side, and stuck it to the wall. I continued this step by varying the different pages.

Processed with VSCOcam with f2 preset

6) I started with just one straight line of pages across the top, and continued working down the wall. When it comes to the bottom of the wall, it is easiest to use your finger nail to cut the extra off once the page is stuck to the wall.

Processed with VSCOcam with f2 preset

The only down side to this technique is that I have to spray a few pages back on when they fall off. Only a few fall off each week, but I am pretty sure they fall because I have a fan constantly on in my room. All together, I am very pleased with how it turned out and I cannot wait to keep adding to the look.

Check out my Instagram for more updates. Also, I would love to see how your walls turn out! Tag me @proverbs3110 on your pictures on Instagram and I’ll be sure to check them out. Happy remodeling!

DIY Cake Pops

Ever wonder how to make your own Cake Pops? Well, I’m here to help!

I have a picnic scheduled for tonight, and for the past week, I have been contemplating what dessert I should make. Then the light bulb went on. I have been wanting to try a turn at making Cake Pops for over a year now, so why not try it for a special occasion? Fortunately, the Cake Pops turned out perfectly, which is a relief because I was worried that I would have a dessert disaster.

Image


So how did I make these lovely Cake Pops, you might ask. Well, it’s your lucky day because I am here to provide you with the recipe.


What You Will Need:

-Cake Mix (and everything you need to bake the cake)

-Cake Frosting

-Candy Melts

-Cake Pop Sticks

-Cake Pop Stand


Step one:

Bake the cake exactly how you would normally bake a cake and leave it to cool down.

Image


Step two:

Once your cake is completely cool, cut the cake into smaller pieces. This will make it easier to crumble the cake.

Image


Step three:

Crumble each piece with your hands into a large bowl. I unfortunately picked a smaller bowl than I should have. I had to make two batches of Cake Pops. Here is how your crumbles should look.

Image


Step four:

Mix in about ⅓ frosting from the container. Remember, LESS IS MORE, but also consider that not enough frosting can result in the Cake Pops falling apart. (This happened with my first batch of Cake Pops. It’s a good thing I had to make two!!) When you squeeze the cake crumples, it should now be easy for it to stick together.

Image


Step five:

In order to get your Cake Pops into balls, it is easier to use a small scooper. Unfortunately, I did not find one in my kitchen, so I just made them with my hands. Place the balls on a plate that will fit in your refrigerator or freezer. Also, it is easier to use smaller plates (5 balls per plate) so they will not fall apart due to being in room temperature. (As you can see, this is the plate from my first batch. I did not use enough icing so they fell apart easily. The second batch I used a tiny bit more than ⅓ of the container, but definitely not ½ of the container. Hope this helps!)

Image

I would recommend placing them in the freezer for 6-8 minutes. While they are in the freezer, melt your candy.Image


Step Six:

Take your first plate out of the freezer. Take a Cake Pop stick and dip the end into the candy that is melted. Then, place a stick in each of the cake balls. After you have finished, place the plate into the freezer for another five minutes. Continue, when ready, with the other plates of cake balls.

Image


Step Seven:

Once the five minutes are up, take the cake balls out of the freezer and drip each into the melted candy. Gently tap the stick on the side of the container to get the extra off. Immediately add any sprinkles to your Cake Pops. Place them on a Cake Pop stand. Since I did not want to buy a Cake Pop stand, I used what i had at home by using Styrofoam which worked perfectly! It does not take long for the Cake Pops to dry.

Image


Ta-Da!! You are finished and have cute, little Cake Pops to share with your friends, to take on a picnic, or to stash away for your own enjoyment. Happy indulging!


NYC Summer Roadtrip: The Major Details.

The dates have been set. The group has been confirmed. Intense studying of books and blogs seems to be an every day occurance. Free activities are being collected into an exuberant list of necessary adventures we must take on our 5-day journey. The abundance of food options are overwhelming. Our budget seems to keep expanding with every minute that passes, but even with all the seriousness of planning, our excitement cannot be contained.

After having our first meeting at Barnes and Noble’s Starbucks yesterday afternoon, the trio of dreamers (Carly, Michaela, and myself) escaped the happenings of normal, summer life and were filled with the acceleration of planning a vacation that will never be forgotten. Our New York City trip has been a dream since our junior year of high school, and having just finished our first year of college, we thought it was time to make our dream into reality.

Processed with VSCOcam with f2 preset

We withdrew ourselves to a corner in the cafe for three hours discussing everything from the fashion boutiques that we will never be able to afford to the Staten Ferry ride to the homeless who live in the city. With our purpose as Christians in mind and our desires to explore, we created a huge list of places where we MUST go.

Next on our later meeting agenda is to figure out exactly where we should go on what days and to further our understanding of our budget. (If anyone desires to donate to the trio of dreamers’ adventure fund, do not delay in contacting me…*wink*) Even with two piggy banks full of change, there is much saving that must be done before the course of our departure occurs.

Once we have completed more of our plans for our summer road trip, I will make another post to further explain more of our wanderlust fantasy. If you have any advice or comments, be sure to write them in the comment box. Also, check out my Instagram or Pinterest NYC board for more information. Happy exploring!

Coffee Crave.

How many of you are guilty of posting a Starbucks drink on Instagram? …Mmhmm. That’s what I thought, but no worries,  I am just as guilty as you are.

I love coffee, or some would say that I love coffee flavored drinks. I cannot stand plain, black coffee, but eventually I believe that I will be able to enjoy it. So when it comes to ordering coffee, I am definitely a sugar addict.

For all of you Pinterest lovers, I am sure that you have pinned one of those Starbucks Secret Recipe pins, but I thought that I would share my ultimate Go-To Starbucks drink. It’s called the Twix Frapp. I am pretty sure it has been my staple for at least two years now. You could say that it is pretty great.

Here’s my disclaimer, I have seen many ways in which you can order this drink, but here is what I ask for: “Could I get a tall Carmel Frapp with pumps of hazelnut and mocha. Also, could i get extra carmel and chocolate syrup drizzled on top, please? And yes, I would definitely like whip cream!”

Perfection in a cup I tell you. Perrrfection.

Let me know your favorite Starbucks recipes in the comments below. Happy coffee breaks, everyone!

Coffee Craze


Francesca’s Boutique Finds.

This weekend, my girls and I decided to make a trip to Ann Arbor to do some shopping. I wasn’t planning on buying anything, but then came Francesca’s Boutique, my weakness. I love everything about this store (except their lack of size extra small). Currently, they had a large sale section which is MY FAVORITE! Francesca’s is a little pricey for my thrifty self, but their pieces never seem to go out of style. What I ended up purchasing was a coral blue maxi skirt for $19.98 and a pink, pearl headband for $14.00. Grand Total of $36.02 with tax. Not bad for the quality of clothing.  I can’t wait to pair the maxi skirt with a coral pink top and a cute statement necklace this spring and summer. Spring come soon!

Photo Feb 23, 7 08 07 PM

Don’t forget to check out my Pinterest page here.

And my Instagram Profile here.